Getting started
Install the panel and sign in. About five minutes, once.
Before you start
What you need on your computer and account.
Caption Bunny is a panel inside Adobe Premiere Pro. It transcribes your timeline, lets you fix the text, and places animated caption templates (MOGRTs) on your sequence. You never export or upload your video.
- Premiere Pro on macOS (Apple Silicon or Intel) or Windows 10/11.
- A Caption Bunny licence. You get it with your purchase, linked to the email you paid with.
- Internet for installing, signing in and downloading speech models. Transcription itself runs offline unless you choose the ElevenLabs cloud engine.
Install and sign in
Download, install on Mac or Windows, open the panel, activate.
Video 1: Install It in Minutes: Caption Bunny for Mac & Windows (Premiere Pro) · Watch on YouTube
- Sign in at captionbunny.com/account and download the installer for your computer from the Downloads card.
- Quit Premiere Pro. The installer can't finish while Premiere is open.
- Mac: unzip, open the
.pkgand follow the steps. If macOS blocks it, right-click the.pkgand choose Open.
Windows: unzip and run the Setup.exe. If SmartScreen appears, click More info, then Run anyway. - Open Premiere and go to Window → Extensions → Caption Bunny. Dock the panel somewhere you can reach it.
- Click Continue with Google using the same email you bought with, or paste the licence key from your purchase email.
Panel not in the Extensions menu? Restart Premiere once. That fixes it almost every time.
Make captions
The everyday workflow: transcribe, check the text, place a style.
Video 2: Your First Captions in Premiere Pro (Caption Bunny) · Watch on YouTube
Transcribe your timeline
Choose the audio, engine, language and pacing, then transcribe.
Video 4: Transcribe Settings: Range, Engine & Language (Caption Bunny) · Watch on YouTube
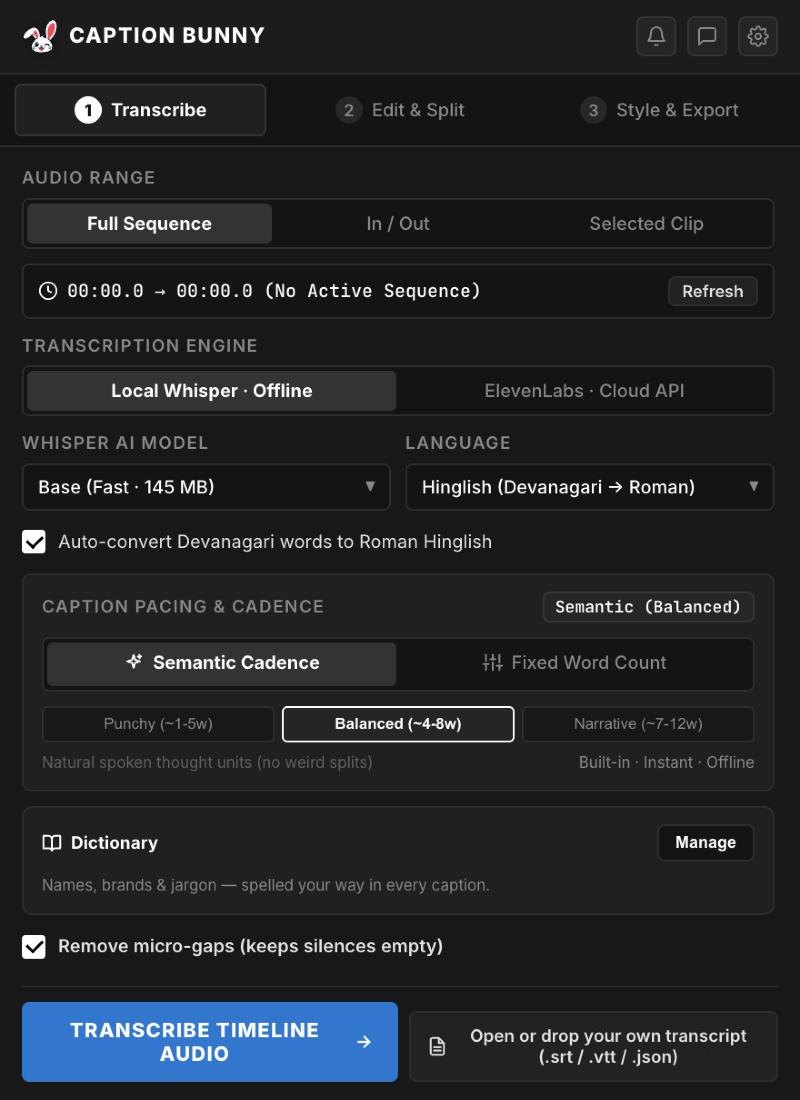
Open the sequence you want to caption, then work down the Transcribe tab from top to bottom.
- Audio Range
- Full Sequence, your In / Out range, or one Selected Clip. Use In / Out to caption only part of a long edit.
- Transcription Engine
- Local Whisper · Offline runs on your computer. ElevenLabs · Cloud API needs your own ElevenLabs key and is best for very noisy audio or heavily mixed languages.
- Whisper AI Model
- Base is fast and fine for clear speech. Download bigger models in Settings (see below) when you need more accuracy.
- Language
- Set it yourself when auto-detect guesses wrong. For mixed Hindi and English, choose Hinglish (Devanagari → Roman) and keep Auto-convert Devanagari words to Roman Hinglish on.
- Caption Pacing & Cadence
- Semantic Cadence breaks lines where a person naturally pauses. Pick Punchy (1–5 words) for Reels, Balanced (4–8) for most videos, or Narrative (7–12) for long talks. Fixed Word Count splits by an exact number instead.
- Dictionary
- Add names, brands and jargon once, and they're spelled your way in every caption.
Click Transcribe Timeline Audio. Already have subtitles? Use Open or drop your own transcript to load an .srt, .vtt or .json file instead.
Edit and split captions
Fix words, split or merge captions, strip fillers.
Video 5: Edit & Split: Clean Up Your Captions in Premiere Pro (Caption Bunny) · Watch on YouTube
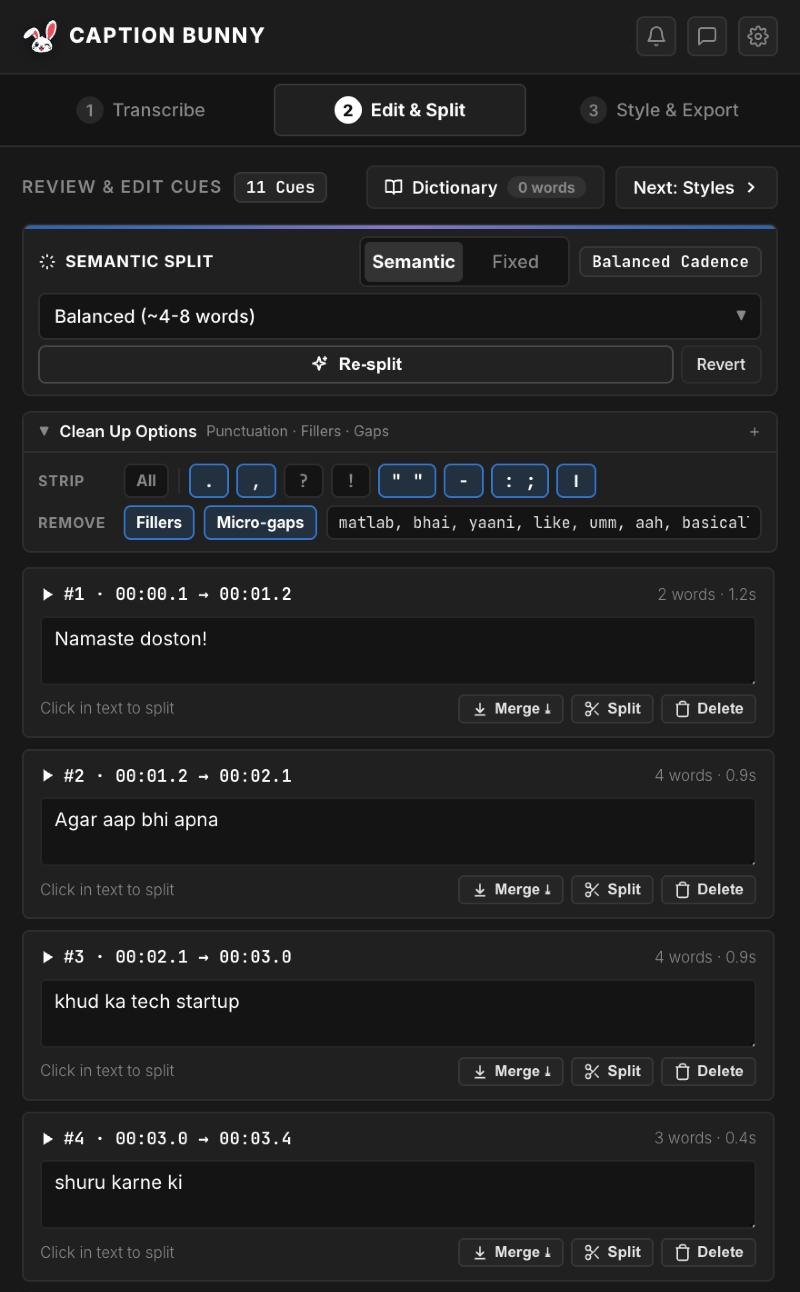
Every caption appears as a card with its timing and word count. Skim the text before you place anything. It's much quicker to fix a word here than on the timeline.
- Fix a word: click into the text and type.
- Split a caption: click where you want the break, then Split.
- Join two captions: Merge ↓ joins a caption with the one below it.
- Re-split everything: change the cadence at the top and click Re-split. Revert undoes it.
- Clean up: under Clean Up Options, strip punctuation in one click, and remove fillers (um, like, matlab, yaani, basically…) and tiny gaps. You can edit the filler list.
Pick a style and place captions
Pick a caption style and place it on the timeline.
Video 6: Style Your Captions: Pick a Look and Generate It (Caption Bunny) · Watch on YouTube
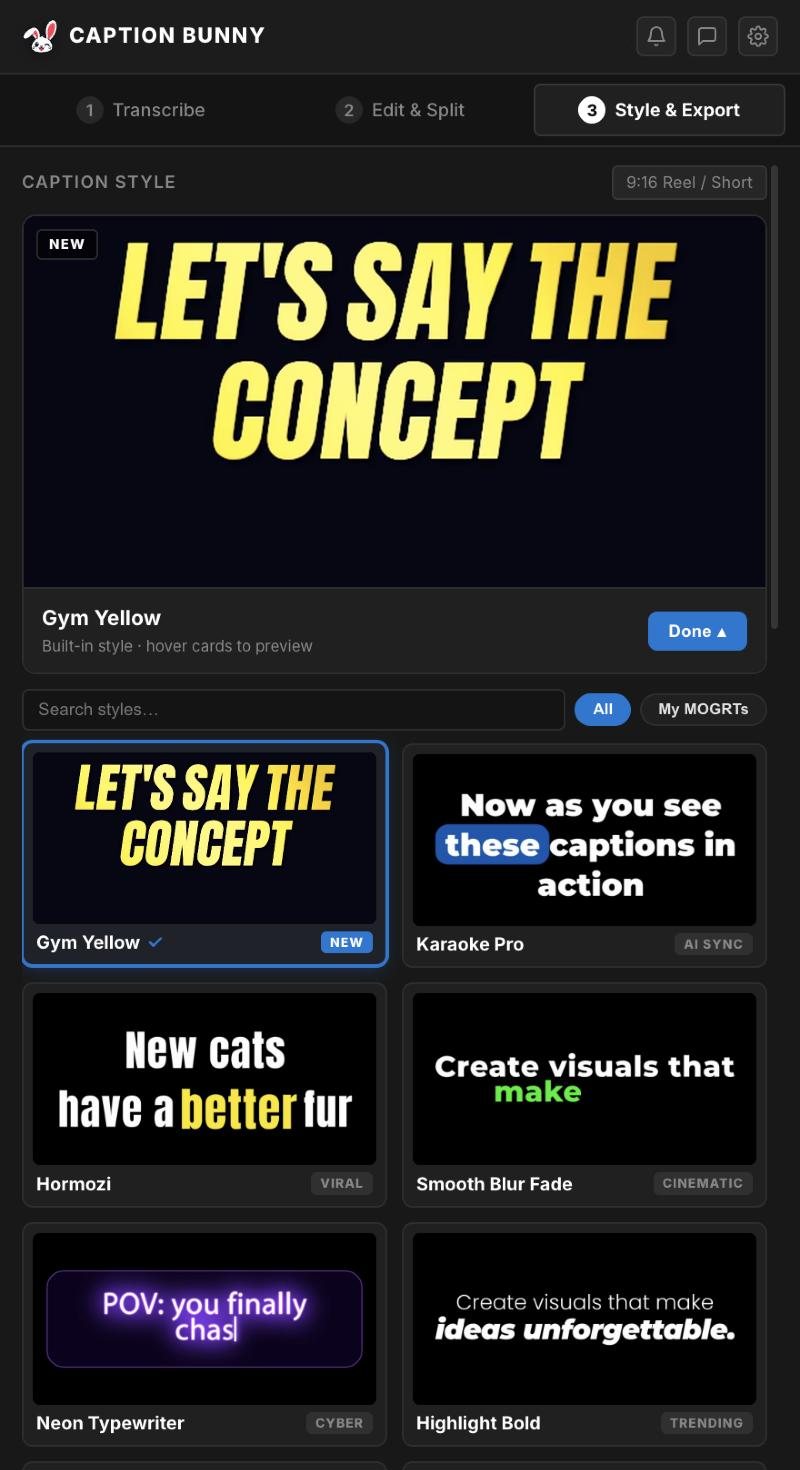
- Go to Style & Export and click Change Style. Hover any card to preview the animation; use the search box to find a style by name.
- Click a style. The panel picks the 9:16, 1:1 or 16:9 version to match your sequence automatically.
- Click Generate. Each caption is placed on the timeline as an editable Motion Graphics Template, timed to the speech.
Using your own templates? Open the My MOGRTs tab in the picker and place them the same way.
Customise
Change the look, save it as a preset, and keep captions in sync with your edit.
Change how captions look
Size, position, colours and line length in Essential Graphics.
Click any caption clip on the timeline and open Premiere's Properties (or Essential Graphics) panel. Every style shows its own controls there.
- Overall Scale makes captions bigger or smaller.
- Position X / Position Y move them. Keep them in the lower middle, clear of the speaker's face and of Instagram or TikTok buttons.
- Colours for the text and the highlighted word.
- Characters Per Line controls line length. Lower it for shorter lines.
- Extras such as glow, shadow or light sweep, depending on the style. Each can be switched on or off.
These changes apply to the selected caption only. To copy one caption's look onto the rest, see Copy Style and Paste Style.
Save a look and swap styles
Save your look, and restyle captions already on the timeline.
Save a look: style one caption the way you like it, select it, and click Save My Style. Give it a name. It appears under My Style Presets, and every new caption you generate with that preset uses the same look.
Swap the style of captions already placed: select some or all caption clips in Premiere, pick a different style or preset in the panel, then click Swap Selected Clips. Text, timing and track stay the same, so you can try a new look without transcribing again.
Timeline tools
Sync to Cuts, Fill Gaps, Copy and Paste Style.
At the bottom of Style & Export:
- Sync to Cuts
- Trimmed or razored your video after placing captions? This fits captions back to your edit so nothing hangs over a cut.
- Fill Gaps
- Stretches each caption to meet the next one so the screen never flashes empty. The animation keeps its original speed.
- Copy Style / Paste Style
- Select a customised caption and click Copy Style. Select the others, click Paste Style, and they all match.
Export and reference
Subtitle files, settings, speech models, and fixes for common problems.
Export subtitles
Native caption track, SRT or VTT.
Need a subtitle file for YouTube, a client, or another editor? In Timeline Tools, open the export menu, choose a format and click the download button:
- Native Caption Track: a Premiere caption track on your timeline.
- SRT: the standard subtitle file. Works almost everywhere, including YouTube.
- VTT: for websites and online players.
The file keeps the same text and timing as your captions, including every fix you made in Edit & Split.
Settings and speech models
Accent colour, auto-fill gaps, and downloading models.
Video 3: Pick Your Model: Which Transcription Model to Use (Caption Bunny) · Watch on YouTube
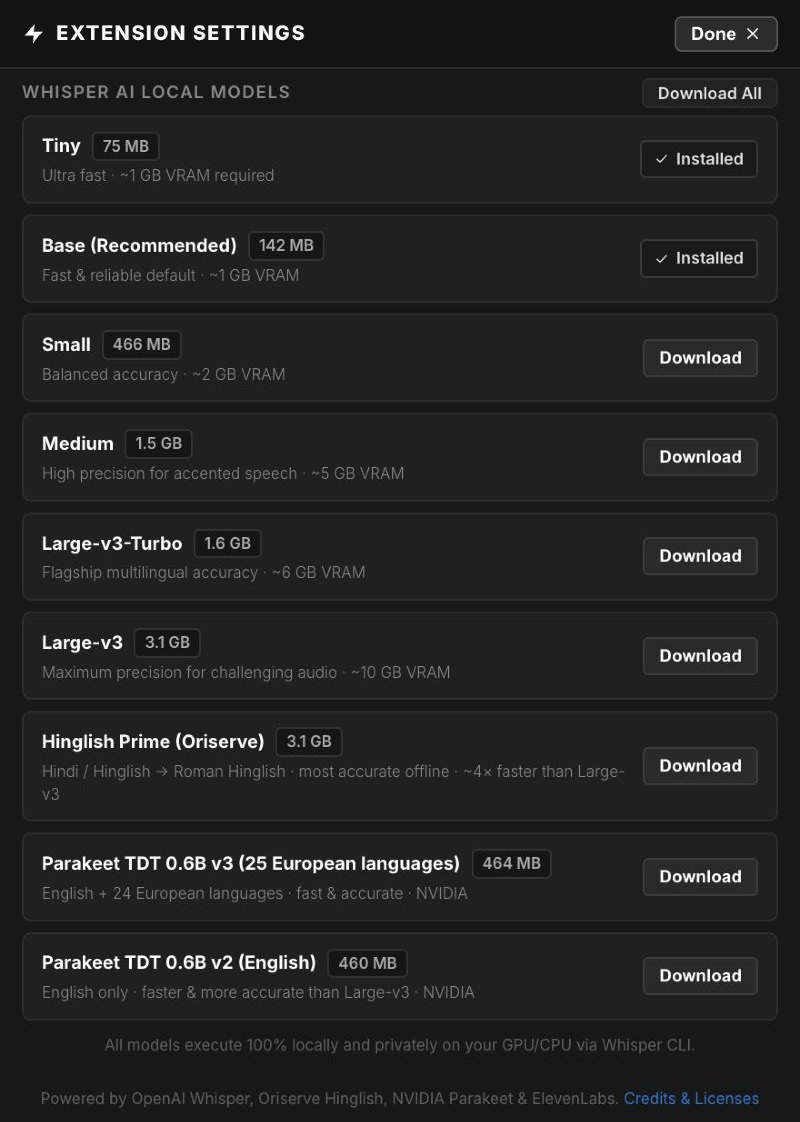
Click the gear icon at the top of the panel.
- Accent colour: recolours the panel's buttons.
- Auto-Fill Timeline Gaps on Generation: fills gaps automatically every time you generate.
- Local models: download models before you need them. Bigger is more accurate but slower:
| Model | Size | Use it for |
|---|---|---|
| Tiny / Base | 75–142 MB | Quick drafts, clear speech |
| Small / Medium | 466 MB – 1.5 GB | Accents and harder audio |
| Large-v3-Turbo / Large-v3 | 1.6–3.1 GB | Best accuracy across 99+ languages |
| Hinglish Prime | 3.1 GB | Hindi and Hinglish, written in Roman letters |
| Parakeet v2 / v3 | ~460 MB | Fast English (v2) or 25 European languages (v3) |
Troubleshooting
Quick fixes, and how to reach support.
- Caption Bunny isn't in Window → Extensions
- Restart Premiere. If it's still missing, run the installer again with Premiere closed.
- Captions drift late on a long video
- Update to the latest panel version and transcribe again.
- A name or brand is wrong
- Fix it in Edit & Split, and add it to the Dictionary so it's right next time.
- Hindi or Hinglish comes out garbled
- Base and Tiny struggle with Hindi. Download Hinglish Prime or Large-v3 in Settings.
- Lines break in odd places
- Change the cadence and Re-split, or lower Characters Per Line in Essential Graphics.
- Captions show over silence
- Keep Remove micro-gaps on, or use Sync to Cuts after editing.
Still stuck? Use the feedback button at the top of the panel, or email support@captionbunny.com. A person reads every message.